
If you want to get the most out of your WordPress blog, you’ll need to become familiar with the various WordPress settings.
When you enter the WordPress Dashboard you’ll see a strip down the left side of your computer monitor. At the top is the label Dashboard. At the very bottom is a clickable label: Collapse menu.
Just above your Collapse menu item is your Settings tab. Click that and you’ll go into one of the most important parts of your WordPress administrative panel.
An Overview of WordPress Settings
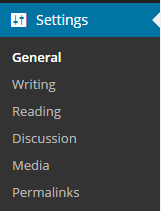 Your WordPress Settings tab consists of a few navigational links, each with a specific function that allows you to manage your blog more efficiently. These are largely ‘set and forget,’ but you can change them at any time.
Settings are visible only to users with the proper login permission. Authors and Contributors, for instance, can’t access your settings and change them without your approval. Certain plugins may also add additional settings upon activation (we won’t be covering those in this post – the possibilities are practically endless!).
WordPress Settings: What to Pay Attention To
General
- Site title: Enter the name of your blog or website.
- Tagline: Don’t make it too long. Some WordPress themes or headers may render your tagline unnecessary. If that is the case, you can leave it blank.
- WordPress address: Enter your blog’s URL (this should already be filled in for you).
- Site address: The above applies again.
- Email address: Use an address that you will check often so that you can receive spam notices and other notifications pertinent to your blog’s management.
- Membership: If you want people to be able to sign up to use your WordPress blog, to leave comments and such, check the Anyone can register box and ascribe a default role (typically, you’ll want it to be Subscriber).
- Timezone: Pick your time zone from the drop-down menu and select an appropriate date and time format.
Writing
Under the Writing tab, the most important settings you should be familiar with are Default Post Category and Update Services.
- Formatting: Check the first box and leave the second one unchecked.
- Default post category: Create categories in Posts > Categories (accessible from the sidebar). After you’ve done that, pick the one that best defines your blog as the default.
- Default post format: For most users, this should be Standard.
- Update services: In order to get people to read your blog, you’ll have to notify them when it is updated. Services that do this for you are called ping services. The Update Services box allows you to list those services you want to ping to give your blog more exposure and traffic. You can get a list of popular ping services from WordPress’ codex.
Reading
WordPress wants to know if you want your blog posts to be the first thing people see when they land on your website, or if you prefer another page to be your home page.
- Front page displays: If you are using WordPress as a content management system, check the Static page box and select a page from the Front page drop-down menu to be your home page. You’ll also want to designate which page is your Posts page. Many WordPress users create a page titled ‘Blog’ and designate that as their Posts page. If you are using WordPress only as a blogging tool with no website attached, select Your latest posts.
- Blog pages show at most: How many posts do you want to appear on your blog’s main page? The default is 10. Some people choose 3 or 5.
- Syndication feeds show the most recent: This is for the news feed your subscribers subscribe to.
- For each article in a feed, show: You can choose full text or summary.
- Search engine visibility: Leave this box unchecked, unless you intend to set up a private website or blog.
Discussion
WordPress defaults many of these options for you, but you should be familiar with them nonetheless.
- Attempt to notify any blogs linked to from the article: This invites those other bloggers into your conversations.
- Allow link notifications from other blogs (pingbacks and trackbacks): It doesn’t hurt to be social.
- Allow people to post comments on new articles: If you don’t want comments, uncheck it. However, comments are good for a number of important reasons.
- Comment author must fill out name and e-mail: Definitely. Check it.
- Users must be registered and logged in to comment: Checking this will increase your site’s security and you’ll get fewer comments. On the flip side, you probably won’t get as many comments.
- Automatically close comments on articles older than X days: Unchecking this box will ensure old posts can still be commented on.
- Enable threaded (nested) comments: Some themes support this and some don’t.
- Break comments into pages: Only useful if you get a lot of comments.
- Comments should be displayed with the (older/newer) comments at the top of the page: The default is older, but some bloggers like new comments at the top.
- Email me whenever: I recommend receiving notifications.
- Before a comment appears: Make sure you approve all comments, especially comments from new readers who have never posted before. Otherwise, you could end up with a lot of spam comments on your blog.
- Comment moderation: Allows you to block comments that contain certain words, such as swear words or common words found in spam email.
- Comment blacklist: You can blacklist IP addresses, URLs or email addresses that post a lot of spam.
- Avatars: You can control the default avatar for commenters and block certain types of avatars you deem inappropriate.
Media
I recommend the default on these settings.
Permalinks
Allows you to set your URL structure for your blog posts. Some people use dates and some don’t. Pick a structure that will allow you to make use of relevant keywords.
Have any questions about WordPress settings? Leave them in the comments below, we’re always happy to help!